Thursday, July 23, 2020

How to implement MERGE statement in SQL Server

SQL Server provides the MERGE statement that allows you to perform three actions (INSERT/UPDATE/DELETE) at the same time. 

The following shows the syntax of the MERGE statement:

MERGE target_table USING source_table ON merge_condition WHEN MATCHED THEN update_statement WHEN NOT MATCHED THEN insert_statement WHEN NOT MATCHED BY SOURCE THEN DELETE;

To implement MERGE Statement, if you run the below example, you can easily learn this concept.

DECLARE  @category AS TABLE (
    category_id INT PRIMARY KEY,
    category_name VARCHAR(255) NOT NULL,
    amount DECIMAL(10 , 2 )
);

INSERT INTO @category(category_id, category_name, amount)
VALUES(1,'Children Bicycles',15000),
    (2,'Comfort Bicycles',25000),
    (3,'Cruisers Bicycles',13000),
    (4,'Cyclocross Bicycles',10000);


DECLARE  @category_staging AS TABLE(
    category_id INT PRIMARY KEY,
    category_name VARCHAR(255) NOT NULL,
    amount DECIMAL(10 , 2 )
);


INSERT INTO @category_staging(category_id, category_name, amount)
VALUES(1,'Children Bicycles',15000),
    (3,'Cruisers Bicycles',13000),
    (4,'Cyclocross Bicycles',20000),
    (5,'Electric Bikes',10000),
    (6,'Mountain Bikes',10000);

SELECT * FROM @category
SELECT * FROM @category_staging


MERGE @category t 
USING @category_staging s
ON (s.category_id = t.category_id)
WHEN MATCHED
    THEN UPDATE SET 
        t.category_name = s.category_name,
        t.amount = s.amount
WHEN NOT MATCHED BY TARGET 
    THEN INSERT (category_id, category_name, amount)
         VALUES (s.category_id, s.category_name, s.amount)
WHEN NOT MATCHED BY SOURCE 
    THEN DELETE
;

SELECT * FROM @category

Thursday, July 9, 2020

How to create and configure a linked server to connect to MySQL in SQL Server Management Studio

Create a linked server in SSMS to connect to the MySQL database.
This article is divided in three sections:
  • Installing ODBC driver for MySQL
  • Configure ODBC driver to connect to MySQL database
  • Create and configure a Linked Server using ODBC driver

Installing ODBC driver for MySQL

ODBC stands for Open Database Connectivity (Connector). It’s developed by Microsoft in the 1990s. Generally, that is API (Application Programming Interface) for accessing database systems.
For non-Windows OS, JDBC (Java Database Connectivity) is used.
Before installing the ODBC driver for MySQL on Windows, make sure that Microsoft Data Access Components (MDAC) are up to date and the Microsoft Visual C++ 2013 Redistributable Package is installed on your system.
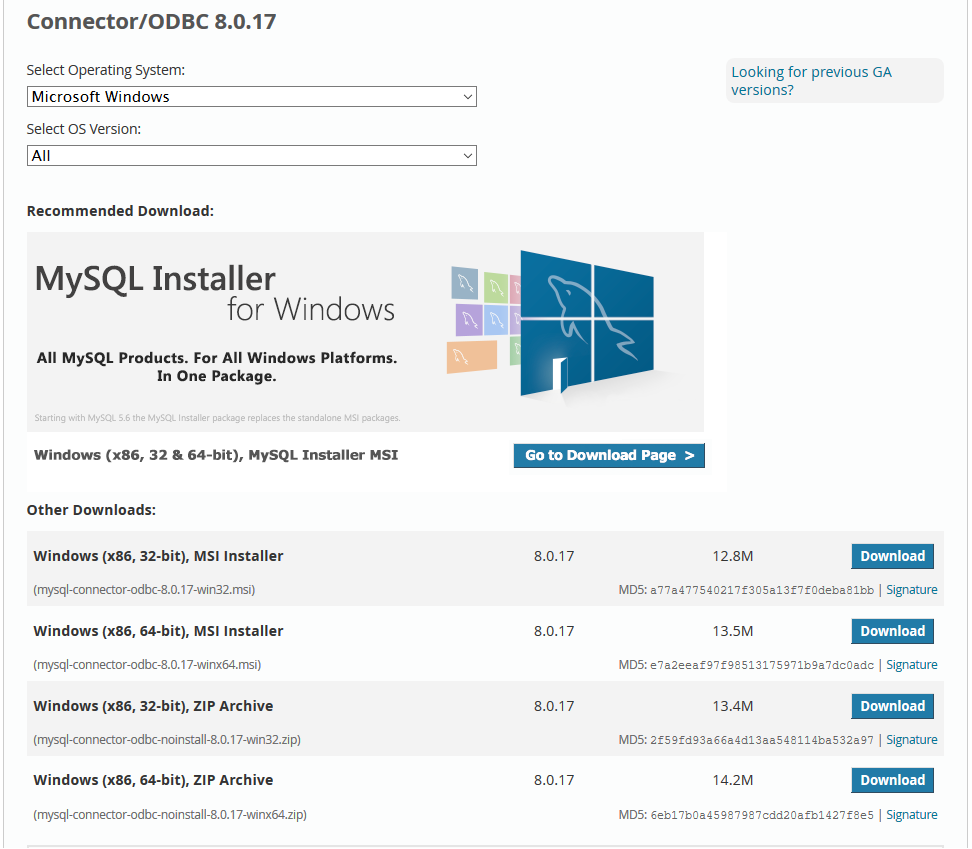
Under this link, the MySQL ODBC drivers for Windows can be downloaded and installed. There are two versions of MySQL ODBC drivers for Windows that can be installed, depending on which application will be used with:
MySQL Connection/ODBC for Windows
  • mysql-connector-odbc-8.0.17-win32.msi for 32-bit application
  • mysql-connector-odbc-8.0.17-winx64.msi for 64-bit application
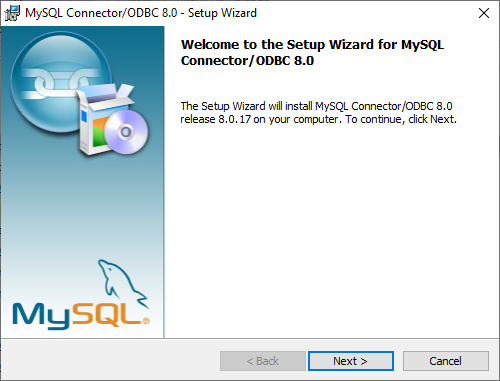
Installation of MySQL ODBC driver for Windows is straightforward. Double-click on the downloaded file, the Welcome dialog will appear:
MySQL Connection/ODBC wizard - Welcome dialog
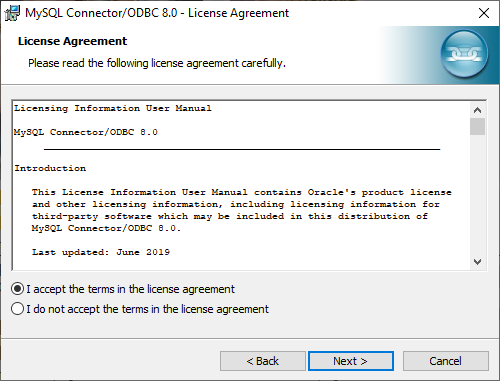
After pressing the Next button, the License Agreement dialog appears. If you agree with the license agreement, press the I accept the terms in the license agreement radio button and click the Next button:
MySQL Connection/ODBC wizard - License Agreement dialog
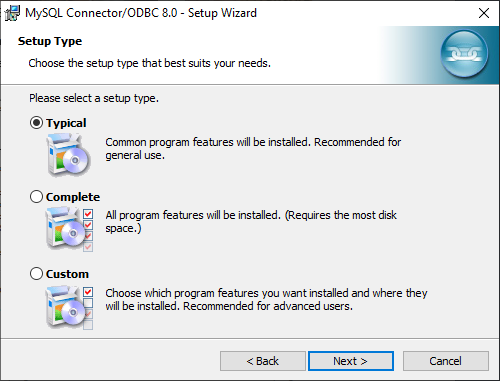
Under the Setup Type dialog, choose the Typical radio button and press the Next button:
MySQL Connection/ODBC wizard - Setup Type dialog
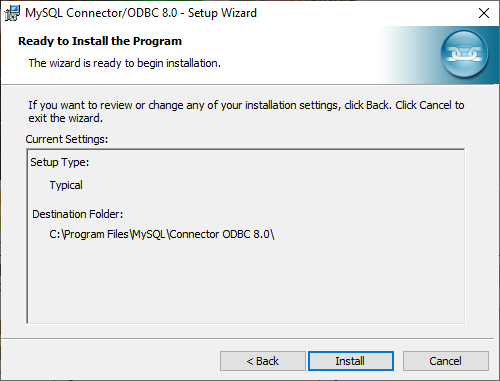
The Ready to Install the Program dialog shows what and where will be installed. Press the Install button to install ODBC driver:
MySQL Connection/ODBC wizard -Ready to Install the Program dialog
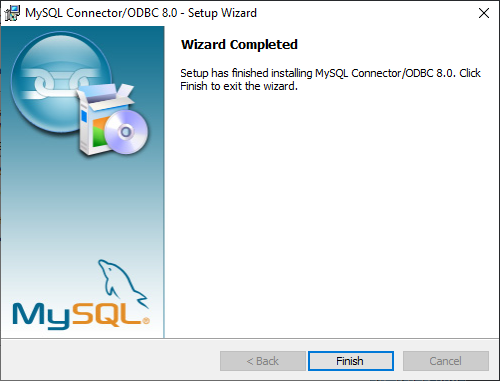
After a couple of seconds, installation of ODBC driver for MySQL is finished:
MySQL Connection/ODBC wizard - Wizard Completed dialog
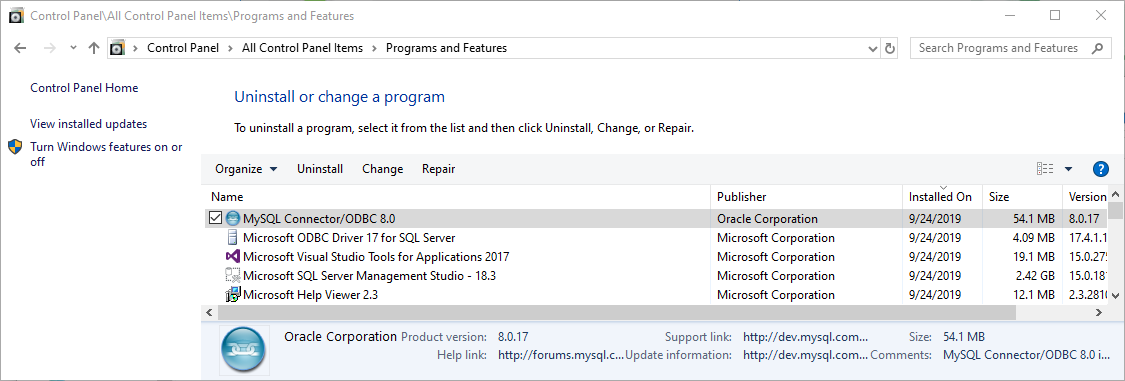
To confirm that ODBC driver for MySQL is installed on machine can be checked from Control Panel:
Check is it the ODBC driver for MySQL installed on machine via Control Panel
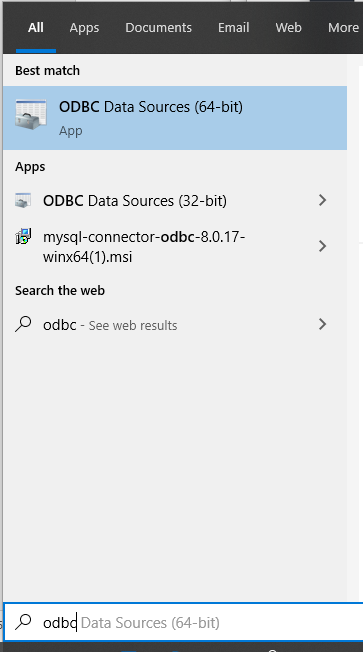
Another way to check is via the ODBC Data Source Administrator dialog box:
Check is it the ODBC driver for MySQL installed on machine via ODBC Data Source Administrator
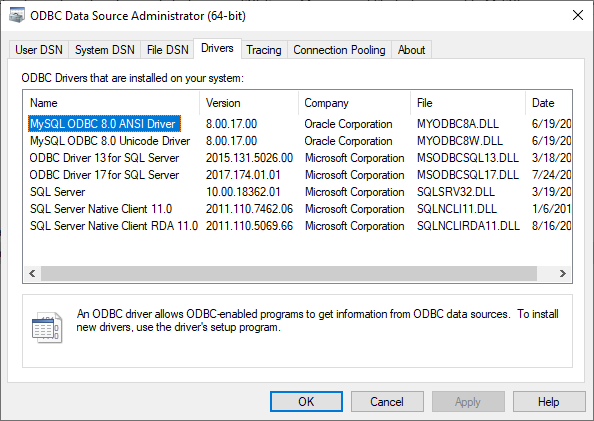
Under the Drivers tab of the ODBC Data Source Administrator dialog box, check if the MySQL ODBC Drivers exist:
Check is it the ODBC driver for MySQL installed on machine via ODBC Data Source Administrator and Drivers tab

Configure ODBC driver to connect to MySQL database

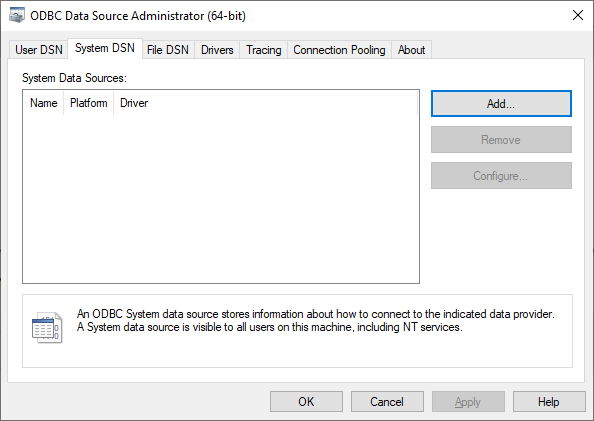
To connect to MySQL database using ODBC drivers, in the ODBC Data Source Administrator dialog, under the System DSN tab, press the Add button:
System DSN tab of the ODBC Data Source Administrator dialog
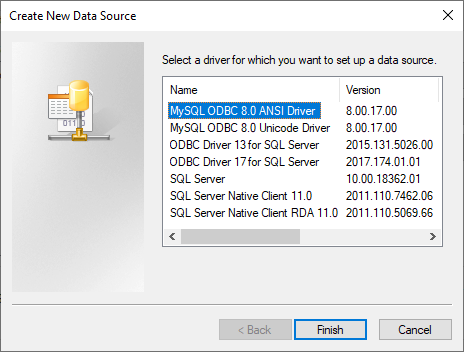
In the Create New Data Source dialog, select the MySQL ODBC Driver and press the Finish button:
Create New Data Source to connect to MySQL
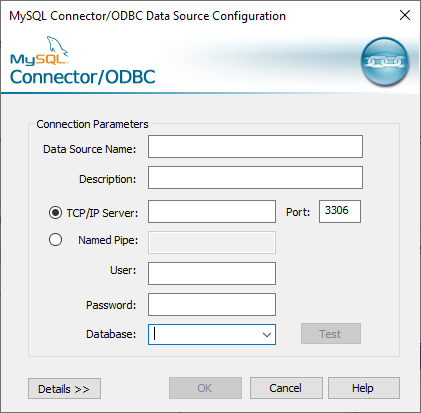
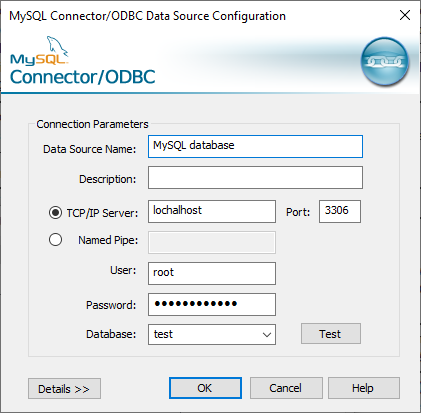
In the MySQL Connector/ODBC Data Source Configuration dialog:
Connector/ODBC configuration dialog to connect to MySQL database
For the Data Source Name text box, enter the data source name by choice. In the Description text box, enter the description of the data source if needed.
Use the TCP/IP Server or Named Pipe connection method to connect to MySQL by selecting appropriate radio button.
In this example, the TCP/IP Server radio button is selected. In the text box, type a host name or IP address of the MySQL server. By default, the host name is localhost and IP address is 127.0.0.1. In the Port box, enter the TCP/IP port on which the MySQL server is listed. By default, it is 3306 port.
In the User box, type the name of the user needed to connect to the MySQL database and, in the Password box, type a user password. Under the Database combo box, choose the database for which want to establish connection:
Connector/ODBC connection parameters to connect to MySQL database
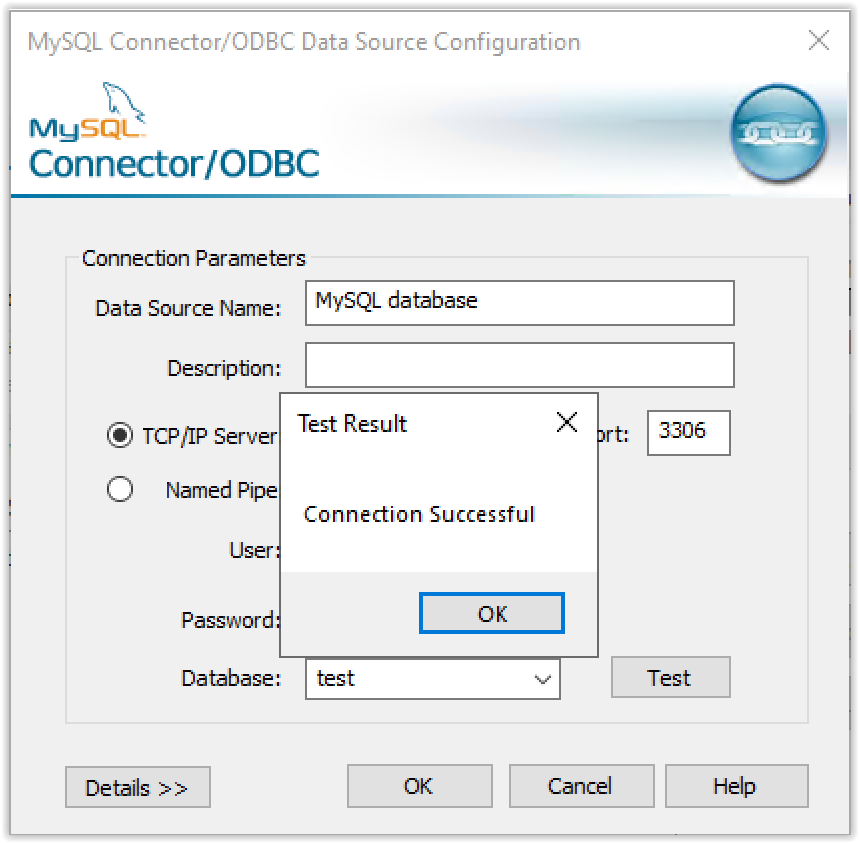
To test if it is connected to MySQL database configured correctly, press the Test button. The following message will appear if the connection is established successfully:
Connect to MySQL database established succesfully
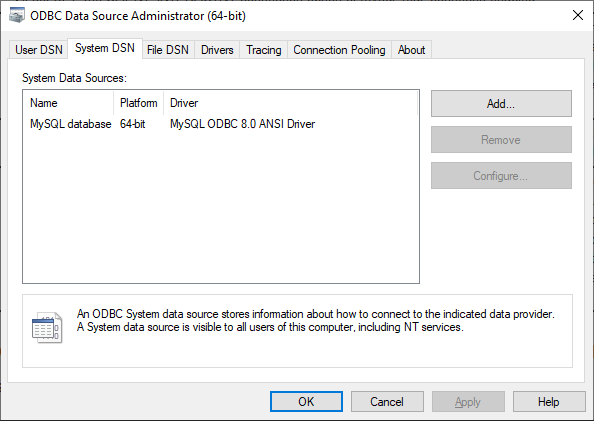
Also, the data source name will appear in the System DSN tab of the ODBC Data Source Administrator dialog:
Newly created data source name in the System DSN tab of the ODBC Data Source Administrator dialog

Create and configure a Linked Server using ODBC driver

Now, when the ODBC driver for MySQL has been installed and ODBC driver to connect to MySQL database has been configured, configuring Linked Server in SSMS to connect to MySQL can begin.
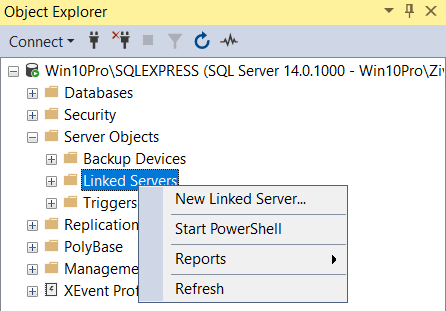
Go to SSMS, in Object Explorer, under the Server Objects folder, right-click on the Linked Servers folder and, from the menu, select the New Linked Server option:
Context menu to create a linked server
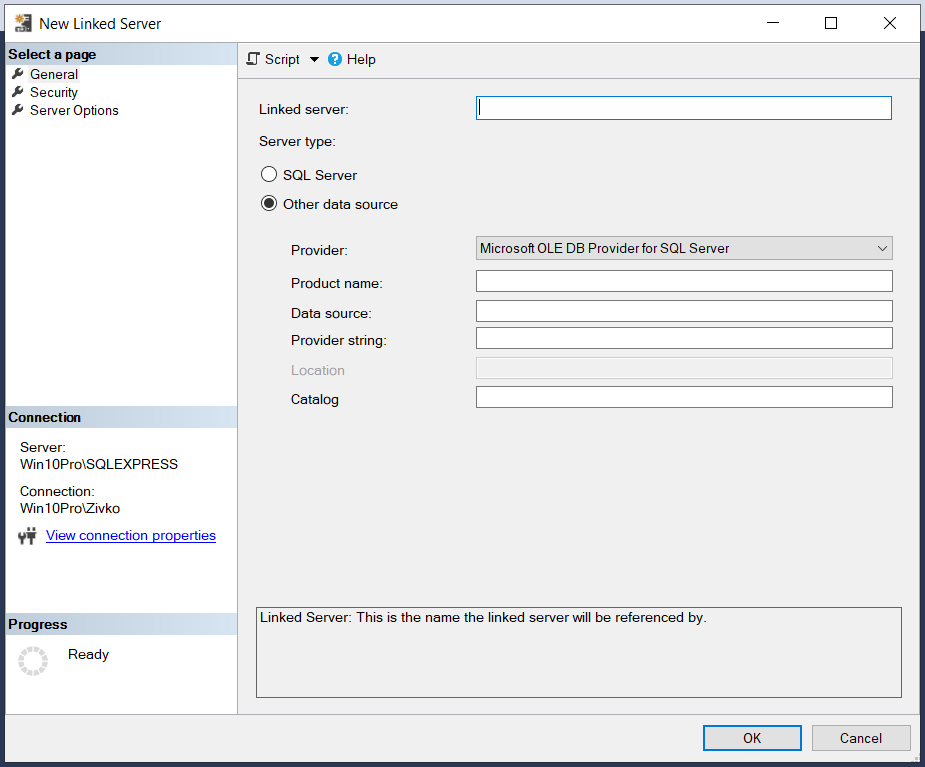
The New Linked Server dialog will appear. Here will be entered configuration to connect to MySQL server:
The New Linked Server dialog
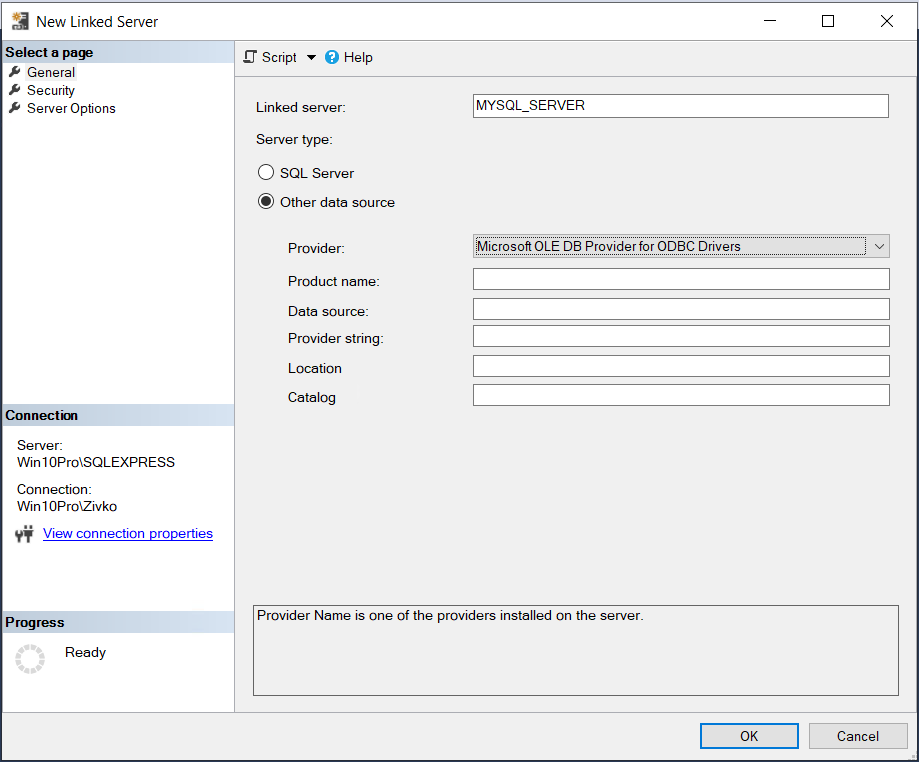
In the Linked server text box of the General tab, enter the name of how the linked server will be called (e.g. MYSQL_SERVER).
Choose the Other data source radio button and from the Provider list, choose the Microsoft OLE DB Provider for ODBC Drivers item:
The New Linked Server dialog  - ODBC Drivers
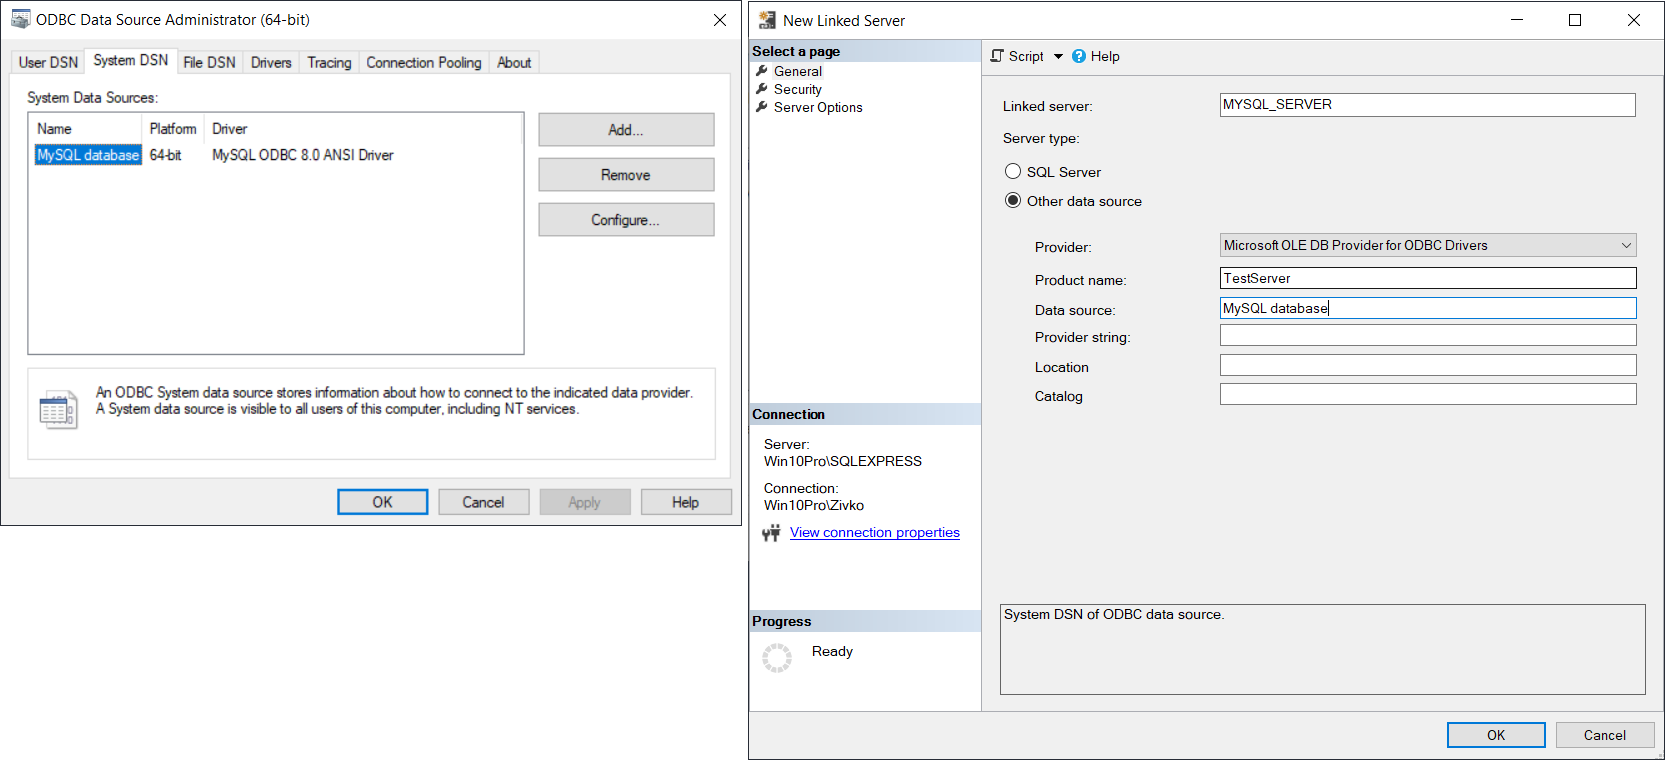
Under the Product name box, enter any appropriate (valid) name. For the Data source, it should be entered the name of ODBC data source:
The New Linked Server dialog  - ODBC Data source
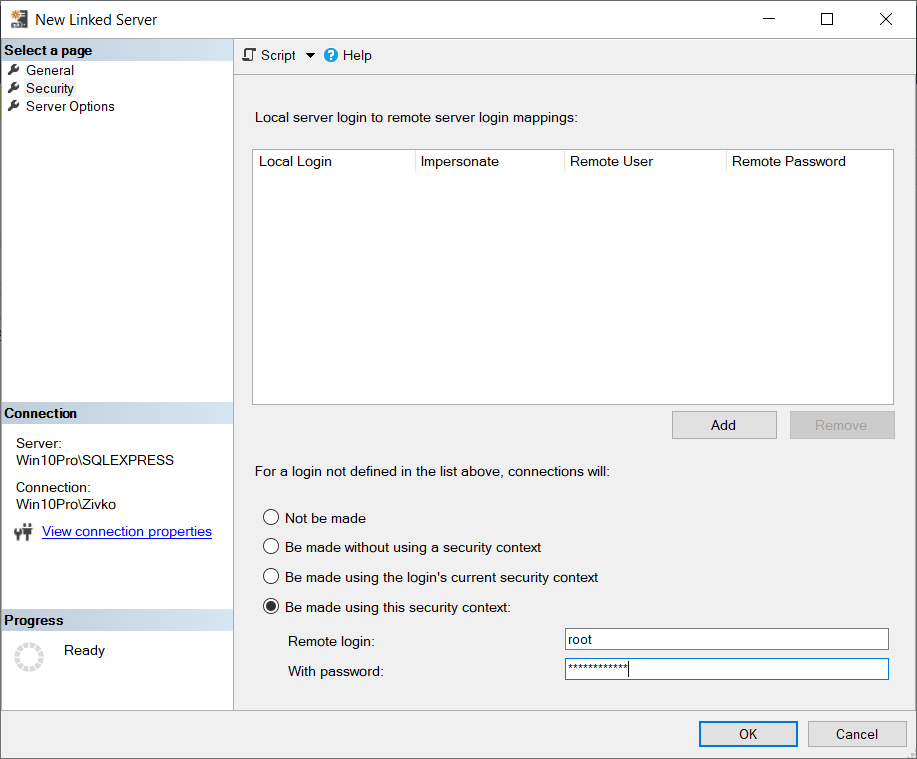
In the Security tab, click the Be made using this security context radio button and in the Remote login and With password boxes, enter the user name and password that exist in the MySQL server instance, that is chosen as data source:
The New Linked Server dialog  - Security tab
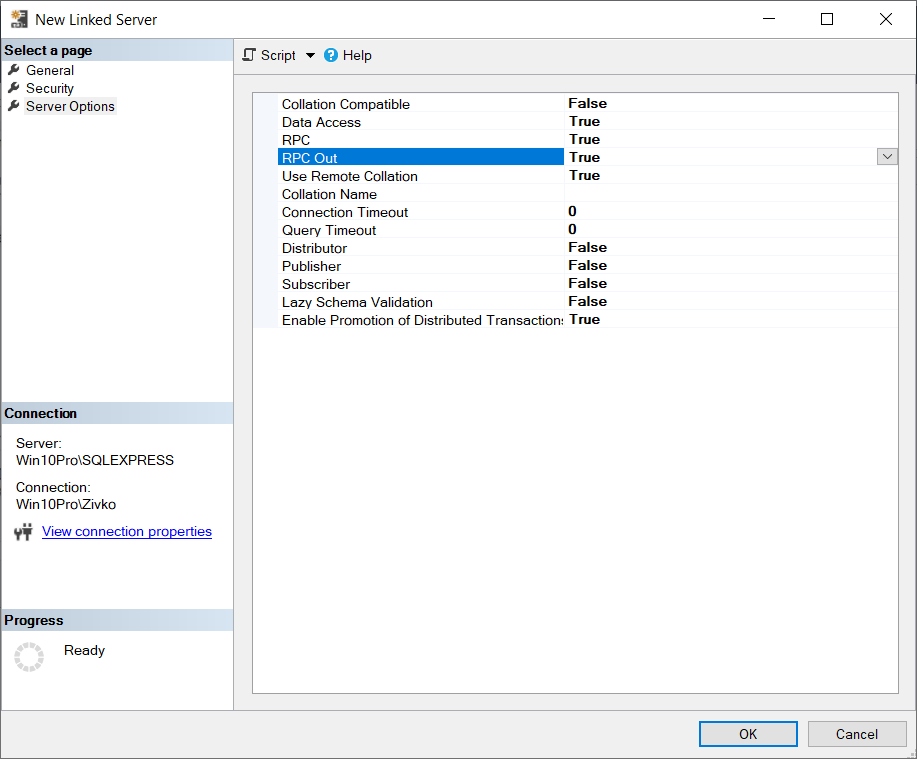
Under the Server Options tab, set the RPC and RPC Out fields to True:
The New Linked Server dialog  -Server Options tab
In case when these two options are not set to true and execute a code like this:
The following error may appear:
Msg 7411, Level 16, State 1, Line 1
Server ‘MYSQL_SERVER’ is not configured for RPC.
More about options under the Security and Server Options tabs can be found on the How to create and configure a linked server in SQL Server Management Studio page.
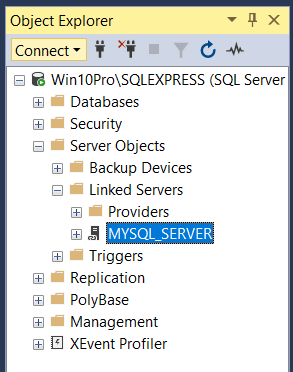
After all options under the New Linked Server dialog are set, press the OK button. Newly created linked server should appear in the Linked Servers folder:
MySQL linked server
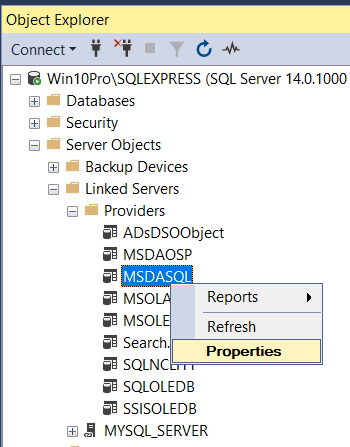
Before start to querying data from MySQL database, go to the Providers folder under the Linked Server folder, right-click on the MSDASQL provider and, from the context menu, choose the Properties command:
MSDASQL provider
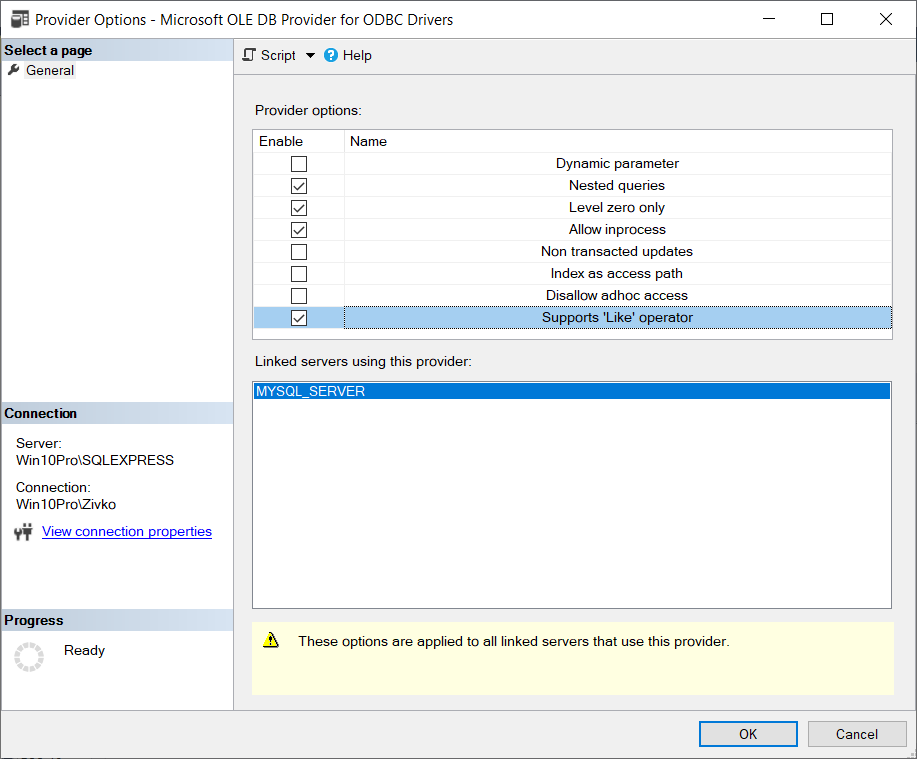
In the Provider Options dialog, check the Nested queries, Level zero only, Allow in process, Support ‘Like’ operator check boxes:
Provider Options dialog
For example, if the Allow in process check box is not checked, when executing code like this:
The following error message may appear:

Msg 7399, Level 16, State 1, Line 1
The OLE DB provider “MSDASQL” for linked server “MYSQL_SERVER” reported an error. Access denied.
Msg 7350, Level 16, State 2, Line 1
Cannot get the column information from OLE DB provider “MSDASQL” for linked server “MYSQL_SERVER”.

The linked Server can also be made by using TSQL scripts:

EXEC master.dbo.sp_addlinkedserver
@server=N'MySQL',
@srvproduct=N'MySQL',
@provider= N'MSDASQL',
@datasrc= N'MySQL',
@provstr=N'DRIVER={MySQL ODBC 8.0 ANSI Driver};SERVER=localost;PORT=3306;DATABASE=healthcare;USER=root;PASSWORD=123464;OPTION=3;'

EXEC master.dbo.sp_addlinkedsrvlogin   
@rmtsrvname = N'MySQL',
@locallogin = NULL,
@rmtuser = N'root',

@rmtpassword= N'123456'

If is there is any error , then RUN below script in MYSQL to give permission to root user.
grant all on *.* to root@localhost

refer below link for more 
https://www.sqlshack.com/create-configure-drop-sql-server-linked-server-using-transact-sql/

Truncating Data in SQL Server and fixed in ANSI_WARNINGS


Here in SQL SERVER 2019, 
Microsoft has fixed one of our old age problem about displaying the column which is being truncated while inserting the data i.e. "String or binary data would be truncated" by the help of ANSI_WARNINGS

Let's check it with an example.

First, create a test table with a single column with datatype varchar(5).
1
2  
3
 USE Test_Data
GO
CREATE TABLE ProductTable (ProductName VARCHAR(5));


Next, try to insert data string which is longer than 5 characters.
1
2
3
  INSERT INTO ProductTable (ProductName)
  VALUES ('Samsung Mobile');
  GO

When you run the above script it will give you the following error:

Msg 2628, Level 16, State 1, Line 1
String or binary data would be truncated in table ‘TestData.dbo.ProductTable’, column ‘ProductName’. Truncated value: ‘Samsu’.
The statement has been terminated.

This is because the string is larger than the maximum width the column can hold. Now let us run a simple select statement and see the data inside the table. You will find that your table is empty and there are no data in it.

While we were working with various options, we turned off the ANSI_WARNINGS for the session and when we ran the same command, the result was interesting. Let us try that out together.

Turn off the ANSI warnings.

1  
2
SET ANSI_WARNINGS OFF
GO

Next, run the following command one more time.
1
2
3
  INSERT INTO ProductTable (ProductName)
  VALUES ('Samsung Mobile');
  GO

Now this time the query will work fine and there will be no error at all.


Tuesday, July 7, 2020

Turning OFF or ON Query Store for All the Database in SQL Server


----// Turning OFF Query Store for All the Databases

SELECT 'USE master;' AS Script
UNION ALL
SELECT 'ALTER DATABASE ['+name+'] SET QUERY_STORE = OFF;'
FROM sys.databases
WHERE name NOT IN ('master', 'model', 'tempdb', 'msdb', 'Resource')
AND is_query_store_on = 1;

----// Turning ON Query Store for All the Databases

SELECT 'USE master;' AS Script
UNION ALL
SELECT 'ALTER DATABASE ['+name+'] SET QUERY_STORE = ON;'
FROM sys.databases
WHERE name NOT IN ('master', 'model', 'tempdb', 'msdb', 'Resource')
AND is_query_store_on = 0;


----// Query Store for All the Databases For Operation Mode = Read Write

SELECT 'USE master;' AS Script
UNION ALL
SELECT 'ALTER DATABASE ['+name+'] SET QUERY_STORE = ON (OPERATION_MODE = READ_WRITE);'
FROM sys.databases
WHERE name NOT IN ('master', 'model', 'tempdb', 'msdb', 'Resource')
AND is_query_store_on = 0;

----// Query Store for All the Databases For Operation Mode = Read Only

SELECT 'USE master;' AS Script
UNION ALL
SELECT 'ALTER DATABASE ['+name+'] SET QUERY_STORE = ON (OPERATION_MODE = READ_ONLY);'
FROM sys.databases
WHERE name NOT IN ('master', 'model', 'tempdb', 'msdb', 'Resource')
AND is_query_store_on = 0;

----// Read-Only Database

-- Script to make database read only 
USE [master]
GO
ALTER DATABASE [TestDb] SET READ_ONLY WITH NO_WAIT
GO

----// Read Write Database

-- Script to make database read write
USE [master]
GO
ALTER DATABASE [TestDb] SET READ_WRITE WITH NO_WAIT

GO

Monday, July 6, 2020

How to Configure Database Mail and Enable it on SQL Server


How to Configure Database Mail and Enable it on the SQL Server Agent

A. Prerequisite Checks and Steps

SMTP Server Info: you’re going to need the fully qualified name, port information, and authentication information for your smtp server. Get this from your sysadmin so you don’t stall out along the way.
SQL Agent Operator: you may want to create an operator before you set this all up. You’ll use it here in your final test. (Don’t worry, that’s fast.)
Setting Checks: There are a couple things we like to look at before trying to configure Database Mail that can throw a real monkey in your wrench.
  1. Make sure Service Broker is still enabled in msdb (it is by default)
  2. Make sure SQL is configured to use the Database Mail XPs (it is NOT by default)
Here’s code to check those things:
Here’s an example of the results that come back:
Picture4
1 & 1

What if Someone Turned Off Service Broker in msdb?

If for some reason Service Broker isn’t enabled, you may have larger issues than this to worry about:
  • Are you using an Edition of SQL Server that supports Database Mail?
  • Was msdb ever restored from backup?
You need to ask these questions before enabling it.

How to Enable Database Mail Extended Procedures – TSQL Option

Reconfiguring your server to use the Database Mail XPs is straightforward. You can do this using TSQL, or you can walk through the wizard below. (It will prompt you if you need to make this change.)

B. Configuring Database Mail Using the Wizard

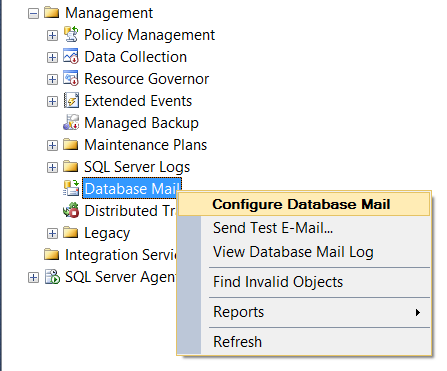
In Object Explorer, expand Management and right click Database Mail:
Picture5
To Boldly Get Bolded So You Know Exactly Where to Click
Click ‘Next’, then click the first option to set up Database Mail.

Step 1: Create a Profile

Name your profile, then click ‘Add’ to add an account:
Picture6
The more descriptive the better, since you may want multiple profiles for different purposes.

STEP 2: Create An Account

When adding an account, specify:
  • Email address: Most people use SQLSERVER01@yourdomain.com
  • Display name: Most people use the SQL Server’s name here, like SQLSERVER01
  • Reply email: Most people use DONOTREPLY@yourdomain.com
  • Server name: this is the smtp server you’re using. Don’t use gmail for production servers, the screenshot is just an example. Seriously.
  • Port and your authentication options. This varies by email service.
Picture7
Ask your sysadmin for the details of your Exchange server.
Remember to use a smpt server or service you trust; these emails will be vital to monitoring your server’s health.

C. Send a Test Email

Right click on “Database Mail” in Object Explorer. Select “Send a Test Email.” Fill out the helpful little form and make sure it works.
If it doesn’t work, there’s a problem in your setup. Right click “Database Mail” again and select “View Database Mail Log” to go hunting and find out where the issue is.

D. Enable Database Mail on the SQL Server Agent

You’re almost there, we promise. At this point your SQL Server can send mail, but the SQL Server Agent can’t yet. You need to tell it how you want it to use Database Mail for it to have powers to alert you about problems.
Right click on the SQL Server Agent and select properties, like this:
SQL Server Agent Properties

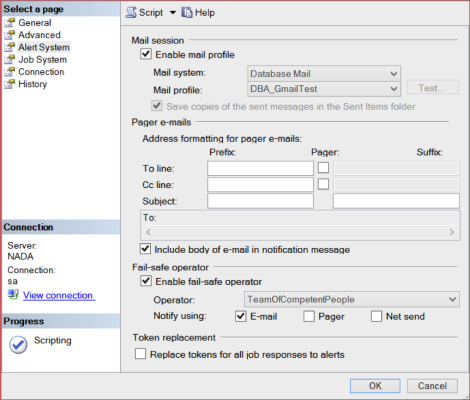
Now Click on the Alert System Tab

This is where you tell the SQL Server Agent what database mail profile to use. Enable the mail profile, then select your mail profile. You may also want to set up your failsafe operator right now. Then click OK.
SQL Agent Alert System

Restart the SQL Server Agent Service to Make That Take Effect

The SQL Server Agent is a little slow to learn: it won’t be able to use database mail until you restart the Agent service. Important reminders:
  • Note that we aren’t talking about the whole SQL Server itself: only the Agent service
  • Check if any jobs are running before restarting the SQL Server Agent Service. It will kill the jobs, and won’t automatically restart them, so you may want to wait until a quiet time when jobs aren’t running to do this step.

E. Test Your Work

You’ve come a long way. Here’s how to revel in your success:
  1. Create a SQL Server agent job named ‘Test’
  2. Give it a single step named ‘Hi’ which executes: print ‘I love my hometown’
  3. Set the step to notify an operator on completion of the job
  4. Run the job
  5. Get the email
  6. Delete the job
  7. Party like it’s 2020

Below query can be used to the check the email status in msdb database.

USE msdb

SELECT * FROM sysmail_allitems
SELECT * FROM sysmail_event_log

DELETE FROM sysmail_allitems

EXECUTE msdb.dbo.sp_send_dbmail
@profile_name = 'MonitorDBActivity',
@recipients = 'nXXXXXXXn@gmail.com',
@subject = 'SQL alert Test email',
@body = 'this is sent from sql server via sp_send_dbmail'
GO